Favorite Info About How To Use N-mosfet As Switch

Unlocking the Secrets of the N-MOSFET
1. N-MOSFETs
So, you want to know how to use an N-MOSFET as a switch? Excellent choice! N-MOSFETs (N-channel Metal-Oxide-Semiconductor Field-Effect Transistors) are little electronic workhorses. Think of them as tiny, electronically controlled gates that can turn circuits on and off. They're widely used in everything from power supplies to motor control, and understanding how they work is a valuable skill for any electronics enthusiast. Forget clunky mechanical switches; these are the silent, efficient ninjas of the electronics world.
But why use an N-MOSFET as a switch in the first place? Well, for starters, they're incredibly fast compared to traditional mechanical switches. Were talking nanosecond switching speeds here! They also have no moving parts, which means they're more reliable and have a longer lifespan. Plus, they can handle relatively high currents and voltages with minimal power loss, making them ideal for a variety of applications. In short, they're just better suited for many modern applications than their mechanical counterparts.
Now, the term "switch" might sound overly simplistic. An N-MOSFET doesn't just flip between fully on and fully off like a light switch. Its more like a valve. You control how much current flows through it. This makes it incredibly versatile. You can use it as a simple on/off switch, or as a variable resistor for controlling things like motor speed or LED brightness. It's all about how you wire it up.
Think of it like this: you're building a robotic arm, and you need precise control over the motors. An N-MOSFET allows you to efficiently and accurately manage the power going to each motor, ensuring smooth and controlled movements. Or perhaps youre designing a custom LED lighting system where you want each LED to dim smoothly; Again, an N-MOSFET is your friend.

Mosfet Switch Circuit Examples Wiring Digital And Schematic
The N-MOSFET's Inner Workings
2. Understanding the Three Terminals
Before we dive into the wiring, let's quickly cover the basics of how an N-MOSFET works. An N-MOSFET has three terminals: the Gate (G), the Drain (D), and the Source (S). The Gate is the control terminal; applying a voltage to it controls the flow of current between the Drain and the Source. If it sounds like science fiction, don't worry. It's surprisingly simple once you get the hang of it.
When the voltage at the Gate (relative to the Source) is below a certain threshold (called the threshold voltage, Vth), the MOSFET is "off," and very little current flows between the Drain and the Source. Think of it as the gate being closed, preventing the flow of electrons. As the Gate voltage increases above Vth, a channel forms between the Drain and the Source, allowing current to flow. The higher the Gate voltage, the wider the channel and the more current that can flow. It's like opening the gate wider and wider, letting more and more electrons through.
The Drain is typically connected to the positive side of your load (the thing you're trying to control, like an LED or a motor), and the Source is typically connected to the ground. When the Gate voltage is high enough, current flows from the positive supply, through the load, through the Drain, through the Source, and back to ground, completing the circuit.
Essentially, you're using a small voltage on the Gate to control a much larger current flowing between the Drain and Source. It's like using a light switch to control a powerful lamp. The light switch only carries a tiny amount of current, but it controls a much larger current flowing to the lamp.
Wiring Up Your N-MOSFET as a Switch
3. Connecting the Components
Alright, let's get our hands dirty! Here's how to wire up an N-MOSFET as a simple switch:
- Identify the terminals: Consult the N-MOSFET's datasheet to identify the Gate, Drain, and Source pins. Theyre usually labeled, but it's always good to double-check.
- Connect the Load: Connect one end of your load (e.g., an LED, resistor, or small motor) to the positive voltage supply (+V). The other end of the load connects to the Drain (D) of the N-MOSFET.
- Connect the Source to Ground: Connect the Source (S) of the N-MOSFET to the ground (GND).
- Connect the Gate Control: Connect a resistor (typically between 1k and 10k) between the Gate (G) and ground (GND). This is a "pull-down" resistor, and it ensures that the Gate is held at ground potential when you're not actively applying a voltage to it, preventing the MOSFET from accidentally turning on.
- Apply a Control Voltage: Now, to turn the switch on, you need to apply a voltage to the Gate. Connect a control signal (e.g., from a microcontroller or a simple switch) to the Gate. When the control signal is high (above the threshold voltage, Vth), the MOSFET will turn on, allowing current to flow through the load. When the control signal is low, the MOSFET will turn off.
It's crucial to include the pull-down resistor. Without it, the Gate can float at an undefined voltage, causing the MOSFET to randomly switch on and off. It's like a door that's not properly latched — it might swing open and closed on its own. The pull-down resistor keeps the door firmly closed until you intentionally open it.
When selecting an N-MOSFET, pay attention to its voltage and current ratings. Make sure the MOSFET can handle the voltage and current required by your load. Exceeding these ratings can damage the MOSFET and lead to a very unpleasant electronic smell. Also, consider the threshold voltage (Vth). You need to make sure that your control signal is high enough to turn the MOSFET on effectively. If Vth is too high, your control signal might not be able to fully switch the MOSFET on, resulting in reduced performance.
Lastly, always consult the datasheet for the specific N-MOSFET you are using. Datasheets provide valuable information about the device's characteristics, including pinout, voltage and current ratings, and thermal properties. Treating the datasheet as your best friend will save you from headaches and potential component failures.

N Channel Mosfet схема подключения
Essential Components and Safety Precautions
4. Protecting Your Circuit and Yourself
Before you start experimenting, let's talk about components and safety. Using the correct components is key to a successful project, and taking proper safety precautions protects both you and your electronics from damage.
Besides the N-MOSFET itself, you'll need a few other essential components. A resistor (as mentioned above) is crucial for limiting current to the gate and preventing unwanted switching. You might also need a flyback diode if you're switching inductive loads like motors or relays. Inductive loads can generate voltage spikes when they're switched off, and a flyback diode provides a path for these spikes to dissipate, protecting the MOSFET from damage. Additionally, a logic-level MOSFET is usually recommended for microcontroller applications, as they have a lower Vth and can be driven directly from the microcontroller's output pins. Remember that not all MOSFETs are created equal!
When working with electronics, safety should always be your top priority. Always double-check your wiring before applying power. Make sure you're using a stable and regulated power supply to avoid voltage spikes. If you're working with high voltages, take extra precautions to avoid electrical shock. It's also a good idea to wear safety glasses to protect your eyes from flying components. If you're unsure about something, don't hesitate to ask for help or consult a reliable online resource.
Pro-tip: a breadboard is your best friend when prototyping. It allows you to easily connect and disconnect components without soldering, making it easy to experiment and troubleshoot your circuits. Start with a simple circuit on a breadboard to understand the basics before moving on to more complex projects. And most importantly, have fun! Electronics can be challenging, but it's also incredibly rewarding to see your projects come to life.

N Channel Jfet Vs Mosfet At Zoe Nanya Blog
Troubleshooting Common Issues
5. Debugging Your N-MOSFET Switch
Even with careful planning, things can sometimes go wrong. Here are a few common issues you might encounter when using an N-MOSFET as a switch, and how to troubleshoot them:
The MOSFET doesn't turn on: First, check the Gate voltage. Is it high enough to exceed the threshold voltage (Vth)? If not, you might need to increase the voltage of your control signal. Also, make sure the pull-down resistor is properly connected and has the correct value. A faulty pull-down resistor can prevent the Gate from reaching a high enough voltage to turn the MOSFET on. Use a multimeter to verify the gate voltage with respect to the source.
The MOSFET turns on, but the load doesn't work: Check the load itself. Is it properly connected? Is it receiving the correct voltage? Use a multimeter to measure the voltage across the load. Also, make sure the MOSFET is rated for the voltage and current required by the load. If the load requires more current than the MOSFET can handle, the MOSFET might not be able to fully switch on the load, and the load might not function properly.
The MOSFET gets hot: This usually indicates that the MOSFET is dissipating too much power. This can happen if the MOSFET is not fully switched on, or if it's being used to switch a high current at a high frequency. Consider using a heat sink to help dissipate the heat. Also, check the datasheet to make sure the MOSFET is being operated within its safe operating area. A logic analyzer will show the switching frequency and the rise and fall times of the signal. High frequency applications require very fast switching MOSFETs.
The load switches on and off intermittently: This can be caused by noise or interference on the Gate signal. Try adding a small capacitor (e.g., 100nF) between the Gate and ground to filter out the noise. Also, make sure the wiring is neat and tidy, and avoid long, unshielded wires, which can act as antennas and pick up noise. Consider using shielded cables for the gate signal. A poorly shielded signal will act like an antenna, and cause all sorts of problems.

FAQ
6. Your Burning Questions Answered
Still have questions? Let's tackle some frequently asked questions about using N-MOSFETs as switches.
Q: Can I use an N-MOSFET to switch AC voltage?
A: While technically possible, it's generally not recommended. N-MOSFETs are primarily designed for switching DC voltages. Switching AC voltages requires more complex circuitry and careful consideration of the MOSFET's characteristics. For AC switching, consider using TRIACs or relays, which are specifically designed for handling AC loads.
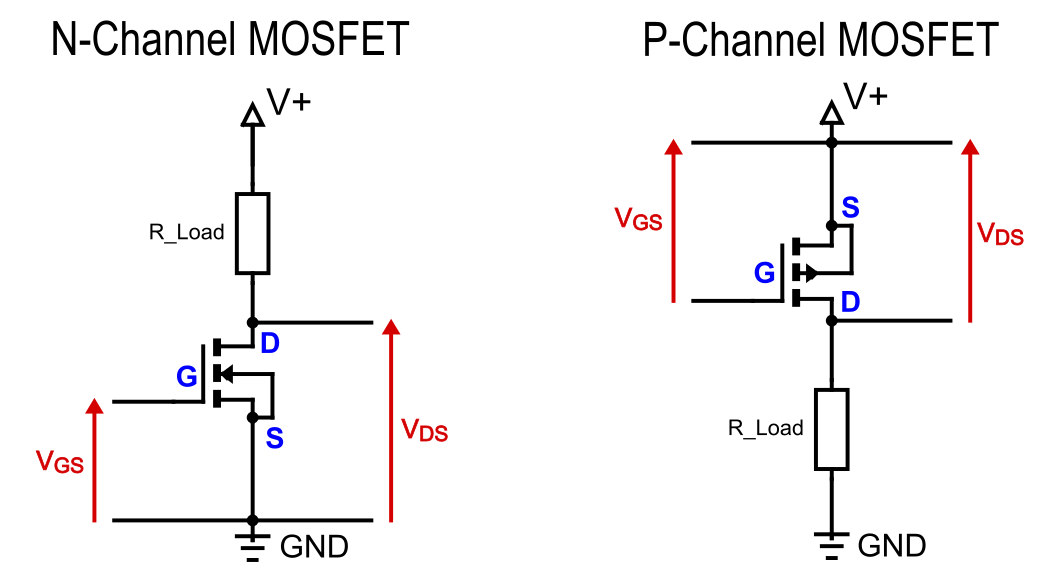
Q: What's the difference between an N-MOSFET and a P-MOSFET?
A: N-MOSFETs are turned on by applying a positive voltage to the Gate, while P-MOSFETs are turned on by applying a negative voltage to the Gate. N-MOSFETs are generally preferred for low-side switching (connecting the load to ground), while P-MOSFETs are often used for high-side switching (connecting the load to the positive voltage supply).
Q: Do I always need a pull-down resistor on the Gate?
A: Yes, almost always! The pull-down resistor ensures that the Gate is held at a defined voltage (ground) when the control signal is low. Without it, the Gate can float at an undefined voltage, causing the MOSFET to randomly switch on and off. It's a simple but crucial component for reliable operation.